

text & graphic added to my own photo with the Rhonna Designs app
I love breakfast: the ritual, the energy it gives me for the day, and the foods themselves. Eggs used to be a huge part of my breakfast repertoire, but I have since discovered that eggs make me come down with a cold within 48 hours of eating them. I almost wrote that this discovery was “a bummer,” but– hello– that’s a gross understatement. It has been truly heartbreaking! 😦
Thankfully, potatoes have saved the first and most important meal of the day! At one point in my diet change-up, I made hash browns from scratch by grating whole potatoes, but felt like that was a lot of effort for something I was only going to devour in a matter of minutes. So when I spotted Mr. Dell’s Shredded Hash Browns on a trip to my local WalMart one day, I tossed them into my cart immediately. Visions of delicious, convenient, safe Saturday morning breakfasts danced through my head. Now they are a staple in our house. These hash browns are advertised as “all natural,” and it’s true– the only ingredient is potatoes. There are no tricky wheat, corn, or soy additives.
It took me a few tries to get my hash browns right; sometimes I overdid it, and sometimes I underdid it, but now I can whip up a batch without paying too much attention. When my husband came home from his recent business trip and remarked that his hash browns at IHOP (breakfast professionals, for goodness’ sake!) didn’t measure up to mine, I figured I should share what I have learned. I’m not saying my hash browns are better than IHOP’s, but there is something to be said for experimenting with food and getting it the way you and your people like it. Even if this is only evidence that the way to a man’s heart is through his stomach, I’ll take it.
I will list my steps to perfect hash browns (for our household, anyway) below with pictures for reference. You will find the “secret” to “perfection” in step 3. You can use your favorite frozen potato shreds or grate your own potatoes. Use this as a guide, but please do change it up to suit the tastes of your own household.
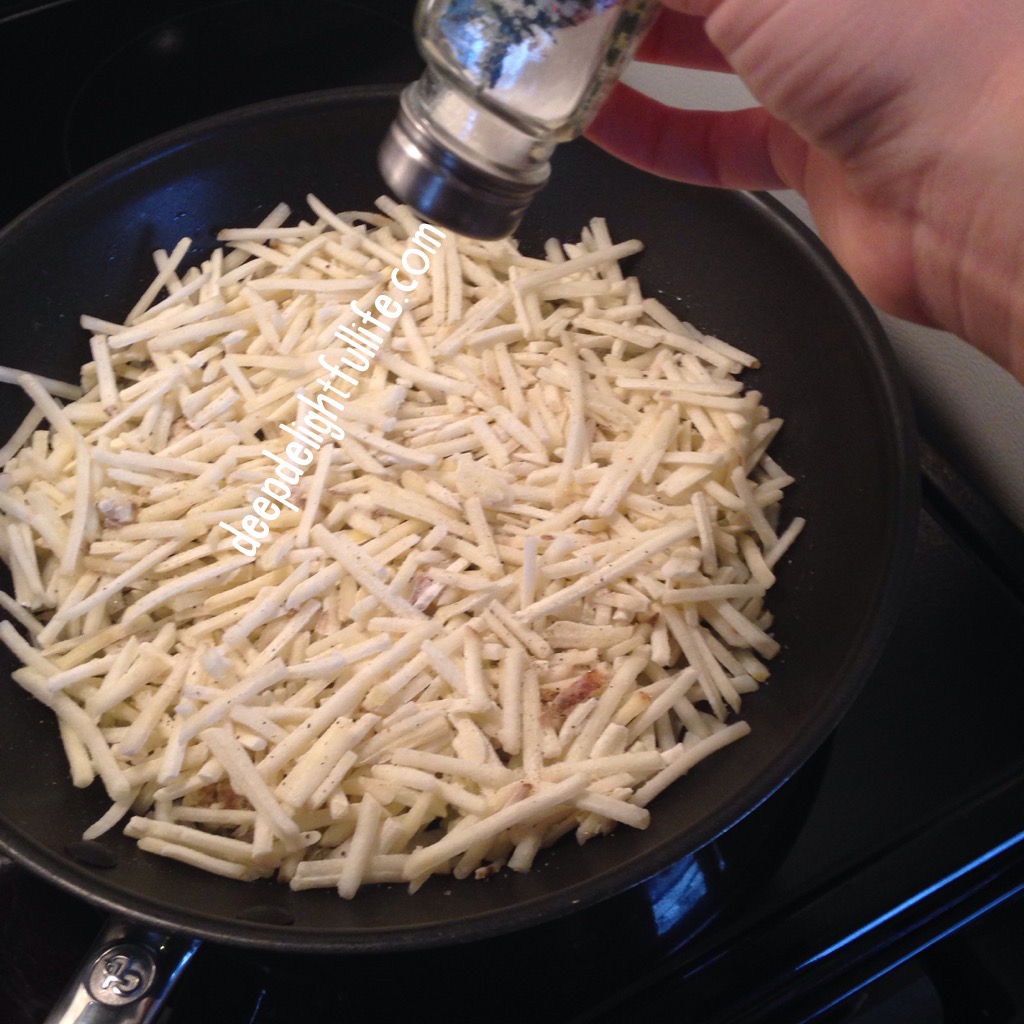
Step 1:
I start with a generous dollop of coconut oil in my non-stick skillet and turn the element up to medium-high heat. (I could probably use my cast iron skillet for this, but I’m intimidated by it. If you have any tips for getting over this fear, please share.) I use enough oil to cover the entire skillet in a thin layer once it melts. Start with a heaping tablespoon.

Step 2:
I add my frozen potato shreds a few handfuls at a time until I can’t see through to the bottom of the skillet. Sometimes I will use the first handful of potatoes to spread the oil around if there are any un-oiled spots on the skillet. Don’t overfill your skillet or you will be left with underdone hash browns; I try not to let the potatoes go too far up the sides. This may require practice.
At this point I also add salt and seasonings (sometimes I like to throw in a little bit of cajun spice).
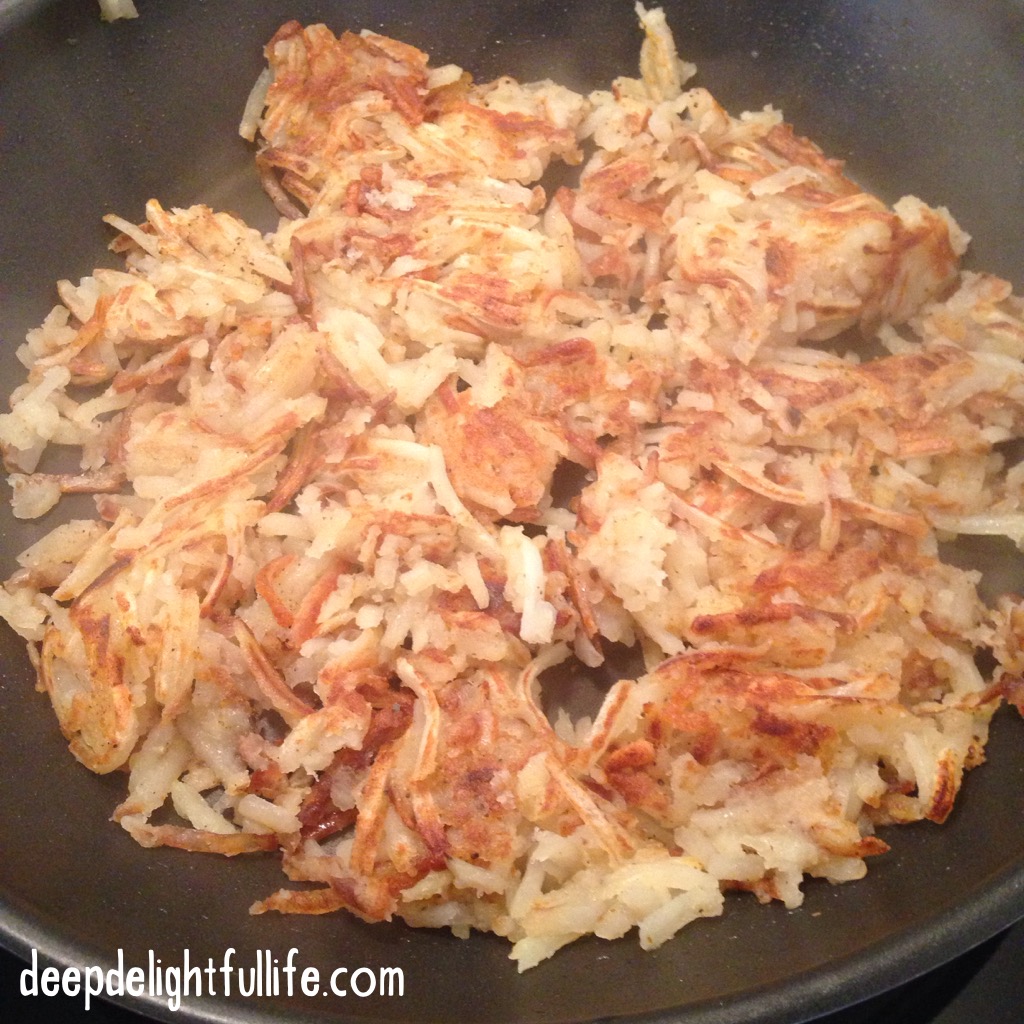
Step 3:
LET THOSE SUCKERS BROWN. Don’t stir them or fuss with them, just let them do their thing. It will take several minutes, but you should notice more of a sizzling sound and be able to see a nice, even steam (or is it smoke? I don’t know) rising up from the skillet. This hands-off waiting is the “secret” I discovered through experimentation. When I stirred and flipped the entire time it actually took longer, and I didn’t get the crispy pieces I was going for. I like to keep myself a little distracted by making coffee or doing some dishes during this step so I don’t hover over the stove. When you notice those sight & sound changes, gently lift some potatoes up to see if they have browned. Once you’ve achieved the desired level of browned-ness, move on to the next step.

Step 4:
Flip. Carefully. This step also takes a bit of practice. You have to know your pan and your spatula. Work in manageable sections and go around the skillet flipping chunks of potatoes over. In the picture below I let them brown a little more than usual, and I think I also overloaded my skillet a little bit. If I had used less, I would have gotten more uniform browning. I also could have potentially skipped step 5, letting the other side brown and serving the hash browns as-is.
At this point you may need to turn the heat down, and it’s a good time to add more salt or seasonings if you want.

Step 5 (optional):
Stir… at your own risk! If you are a perfectionist like me, you will probably want to do this to get a more uniform browning. Arrange any underdone portions so they can brown up a bit, but watch closely to make sure you don’t burn the already browned portions. It should only take a couple minutes. Once I’m done with this step I turn off the heat but leave the skillet on the element.. UNLESS I am close to burning some portions, then I remove the skillet from the element immediately.
Serve the hash browns while they’re still warm and endear yourself to your people forever.
That’s it! It seems like a lot, but it only takes 15-20 minutes total and the taste is worth it! I topped mine with Annie’s Organic ketchup that is really good, but once I use it up I’m planning to use only the homemade stuff so I can avoid added sugars. I also had some allergy friendly banana bread, fresh pineapple, and coffee (duh).
I hope you will enjoy these hash browns as much as we do. I’m planning to make them tomorrow morning. Do you have a go-to breakfast food that your family loves?

DID YOU MAKE HASH BROWNS THIS MORNING?!? I hope there are leftovers for lunch!!
Seriously people, these hash browns are the best around!
LikeLike
HASHBROWNS!!!!! I’m witnessing Dustin preparing them just this moment.
LikeLike
Yummmmmm, hashbrowns are an anytime treat! I hope he was successful in his attempt!
LikeLike